Microsoft Dynamics GP 2016 web client UI not displaying icons
Just today, I ran into a community forum post requesting an answer on why Microsoft Dynamics GP 2016 web client UI does not display icons. Since I had ran into this same issue before, I though I would I create this article to address the topic.
The Problem
Most users reporting this issue, experience things like the images shown below, where the Microsoft Dynamics GP logo and upper left corner application splash image are missing.
Furthermore, if you are able to access the application, mind you, sometimes this is not possible due to static content restrictions, you may find that your navigation bar and other areas of the application are missing the respective icons.
It is worth noting that in most cases, the missing icons do not negate the events of the buttons or objects they are associated with.
The theory
In web development, static content are files that don't change based on user input, and they consist of things like JavaScript, Cascading Style Sheets, Images, and HTML files. As you would expect, the Microsoft Dynamics GP web client icons and images fall within the category of static content. However, it is necessary to instruct the web server, in this case Internet Information Services (IIS), that it must publish any such content when identified.
Static Content is a feature that is turned on by default when IIS is deployed bare bones, this is, accepting all the default features - this is also known as deploying a static content IIS web server, which is the most basic of web servers.
The solution
Below, you will find instructions for Windows 10 and Windows Server 2012 and above.
Installing IIS Features on Windows 8 and Windows 10: Static Content
1. Right-click on Start and choose Program and Features

2. In the Windows Features window, locate and expand Internet Information Services.

3. Expand World Wide Web Services and Common HTTP Features.

4. Click on Static Content, to enable this feature.

5. Click the OK button. Windows 8 and Windows 10 will proceed to apply the selected changes. When finished, click the Close button to exit.

At this stage, a reboot may or may not be required. Follow any instructions provided after closing the window.
Installing IIS Features on Windows Server 2012 R2: Static Content
1. Open Server Manager by clicking the Server Manager icon on the task bar
2. In the Server Manager window, with the Dashboard and Quick Start selected, click Add roles and features, or click the Manage menu, and then click Add Roles and Features. The Add Roles and Features Wizard will start with a Before You Begin page. The wizard asks for verification of the following:
4. On the Installation Type page, select Role-based or feature-based installation to configure a single server. Click Next.

5. On the Server Selection page, select Select a server from the server pool, and then select a server.

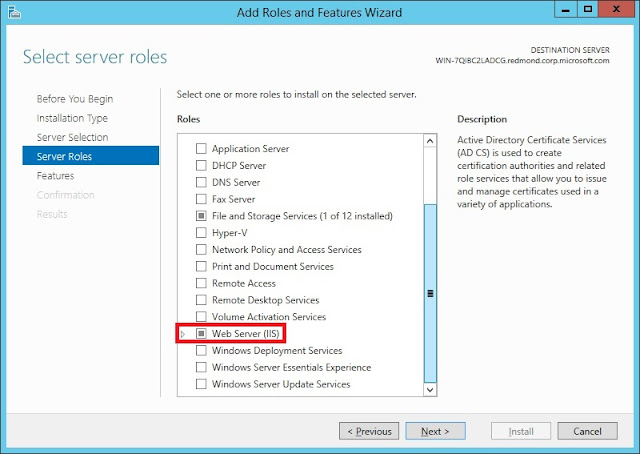
6. On the Server Roles page, expand Web Server (IIS).
7. Click Next twice to bypass the Features page and the Web Server Role (IIS) page.
8. On the Role Services page, expand Web Server and Common HTTP Features. Click to enable Static Content.

9. After you have added the role services that you need on the Role Services page, click Next.
10. On the Confirmation page, verify the role services and features that are selected. Select Restart the destination server automatically if required to restart the destination server if the settings need to take immediate effect. To save the configuration information to an XML-based file that you can use for unattended installations with Windows PowerShell, select Export configuration settings, move to the appropriate path in the Save As dialog box, enter a file name, and then click Save.
When you are ready to start the installation process on the Confirmation page, click Install.
Until next post!
MG.-
Mariano Gomez, MVP

The Problem
Most users reporting this issue, experience things like the images shown below, where the Microsoft Dynamics GP logo and upper left corner application splash image are missing.
 |
| Microsoft Dynamics GP Sign In page (Sessions) |
Furthermore, if you are able to access the application, mind you, sometimes this is not possible due to static content restrictions, you may find that your navigation bar and other areas of the application are missing the respective icons.
It is worth noting that in most cases, the missing icons do not negate the events of the buttons or objects they are associated with.
The theory
In web development, static content are files that don't change based on user input, and they consist of things like JavaScript, Cascading Style Sheets, Images, and HTML files. As you would expect, the Microsoft Dynamics GP web client icons and images fall within the category of static content. However, it is necessary to instruct the web server, in this case Internet Information Services (IIS), that it must publish any such content when identified.
Static Content is a feature that is turned on by default when IIS is deployed bare bones, this is, accepting all the default features - this is also known as deploying a static content IIS web server, which is the most basic of web servers.
The solution
Below, you will find instructions for Windows 10 and Windows Server 2012 and above.
Installing IIS Features on Windows 8 and Windows 10: Static Content
1. Right-click on Start and choose Program and Features
2. In the Windows Features window, locate and expand Internet Information Services.
3. Expand World Wide Web Services and Common HTTP Features.
4. Click on Static Content, to enable this feature.
5. Click the OK button. Windows 8 and Windows 10 will proceed to apply the selected changes. When finished, click the Close button to exit.

At this stage, a reboot may or may not be required. Follow any instructions provided after closing the window.
Installing IIS Features on Windows Server 2012 R2: Static Content
1. Open Server Manager by clicking the Server Manager icon on the task bar
2. In the Server Manager window, with the Dashboard and Quick Start selected, click Add roles and features, or click the Manage menu, and then click Add Roles and Features. The Add Roles and Features Wizard will start with a Before You Begin page. The wizard asks for verification of the following:
- The administrator account has a strong password.
- The network settings, such as IP addresses, are configured.
- The most current security updates from Windows® Update are installed.
4. On the Installation Type page, select Role-based or feature-based installation to configure a single server. Click Next.

5. On the Server Selection page, select Select a server from the server pool, and then select a server.

6. On the Server Roles page, expand Web Server (IIS).

7. Click Next twice to bypass the Features page and the Web Server Role (IIS) page.
8. On the Role Services page, expand Web Server and Common HTTP Features. Click to enable Static Content.

9. After you have added the role services that you need on the Role Services page, click Next.
10. On the Confirmation page, verify the role services and features that are selected. Select Restart the destination server automatically if required to restart the destination server if the settings need to take immediate effect. To save the configuration information to an XML-based file that you can use for unattended installations with Windows PowerShell, select Export configuration settings, move to the appropriate path in the Save As dialog box, enter a file name, and then click Save.
When you are ready to start the installation process on the Confirmation page, click Install.
Until next post!
MG.-
Mariano Gomez, MVP


Comments